Want to DIY your SEO website audit?
If you’re not ready to outsource your SEO and want to do a DIY SEO audit on your WordPress website, here is a simple checklist for you.
An SEO audit can help you discover errors and issues on your WordPress website that might be hurting your search engine rankings. If you fix these, you could boost your search rankings and increase website traffic!
What is an SEO audit?
An SEO audit is an in-depth review of your website to identify on-page, technical, and off-page SEO issues. SEO audits can uncover simple issues like missing image alt tags, incorrect use of HTML headings, and slow site speed. They can also find more complex problems like a lack of internal links, duplicate content, or poor page indexing. All these issues are fixable, and you can probably DIY them! If you run into trouble, you are always welcome to ask us questions.
Who should get an SEO audit?
If you have a WordPress website and want to drive traffic to it, you need an SEO audit.
If you improve all your ranking factors, you can boost your website’s search rankings and drive visitors to your site. The more activity on your website, the more search engines will push your site up the search rankings, and you’ll compound your success!
Google uses more than 200 factors to determine where a website ranks in its search engine results pages (SERPs). An SEO audit helps you discover what SEO issues you can fix to improve your chances of ranking for your target keywords.
When is the best time to get an SEO audit?
If your website is up and running, the best time to get an SEO audit is yesterday!
Ideally, SEO should be considered when planning a website, long before it’s built. However, that isn’t possible for websites that are already live, so get going as fast as possible.
If we do an SEO audit for a client, we start with keyword research and their list of preferred target keywords, and then audit their website based on those. But there’s no bad time to do an SEO audit. The sooner you uncover and fix any SEO problems you have, the better. Your site’s search rankings and not static and constantly fluctuate.
If you start your DIY SEO audit today, you can boost your rankings as soon as possible.
SEO tools you’ll need for your DIY SEO audit
1. A Gmail account
You’ll need a Gmail account to use Google’s services. If you don’t have one, set up a Gmail account here. If you are setting these services (like Analytics and Search Console) up for the first time, use the same Gmail account for all of them.
2. Google Analytics
Analytics definitely should have been installed and set up when your website was launched. If it is installed and working, then you’re good to go. If not, please set up Google Analytics here and install it first, as it takes 24-48 hours for traffic to appear in your results. A history of web traffic will also be useful when diagnosing SEO issues, so you might have to leave it to record your traffic for a few weeks.
Here are detailed instructions for setting up Google Analytics on your WordPress website.
3. Google Search Console
If this isn’t already set up, please go here to set up your Google Search Console account. The only requirement is that you already have a Gmail account. Use the same account that you used to set up Google Analytics.
Open Search Console, then add and verify ownership of your site. You’ll need to prove that you are the owner of your website, because Search Console shows information about your site that only site owners should see, and allows you to make changes that can affect how your site appears on Google.
4. Screaming Frog
This is free software that can diagnose multiple issues on websites. The free version allows you to crawl up to 500 URLs. If your website is larger than that, you’ll need a paid license. This software can seem complicated and a little overwhelming at first, but we’ll explain what to look for in the clear instructions below.
Download Screaming Frog here and install it on your computer.
5. SEO tool (like Ubersuggest)
There are many tools on the market, but Ubersuggest is a cost-effective option for your DIY SEO audit. It will give you more than enough information to work with as you begin your SEO, and you can start with a free account. The 1 website plan is only US$12 per month.
If you decide you want a more in-depth SEO analysis, you might consider partnering with an SEO agency.
Open a free account and add your website to it. Choose the target region (i.e. the region where your target market will be searching for you). You will add your target keywords in the instructions further down. Connect your Ubersuggest account to Google Analytics and Google Search Console.
6. Yoast (a WordPress plugin)
Install Yoast on your website and follow the simple setup instructions.
How to start your DIY SEO audit
We will begin by conducting keyword research. This is an ESSENTIAL part of the Search Engine Optimisation process. Too many people miss out on this step! The rest of your SEO efforts might as well be in vain if you haven’t done proper keyword research. Make sure you check out your competitors, too, to see what they rank for. They may give you some useful ideas.
1. Keyword research
Keep it simple so you don’t get overwhelmed before you even get going. Choose approximately 10 target keywords you want your website to rank for in search engine results.
Remember this when choosing your keywords:
- They should be PHRASES (3+ words per phrase that describe your products or services).
- They should be the wording your CUSTOMER would type into a search engine to look for your product or service. (Ironically, this wording is often slightly different from how you might describe your own business.)
- They should address the searcher’s intent when conducting online searches.
2. Load these keywords into Ubersuggest
In Ubersuggest, click ‘Rank Tracking’ in the top left menu. Further down the main page on the right, click the ‘Add Keywords’ button and add your target keywords. It will take a few minutes (sometimes hours) for Ubersuggest to start tracking your keywords.
Once Ubersuggest has gathered the data and is displaying which of your keywords you rank for (if any), you can also see the search volume of those keywords. ‘Search Volume’ is the number of keyword searches for this keyword (phrase) per month.
3. Update target keywords if necessary and recheck
At first, you want to target more specific keywords (phrases) with lower search volume and less competition. If you target keywords that are too general, the volume will be much higher, but so will the competition. This means you won’t rank for them, and your efforts will be wasted.
PRO TIP: Scroll to the bottom of the main Dashboard page on Ubersuggest and add some of your competitors. View your competitor tracking and see what keywords are generating traffic for your competitors’ websites. This might give you a good idea of what could work for your site, too.
Keyword research and deciding which keywords to target can be tricky. Start small; otherwise, you’ll get overwhelmed and give up.
Target keywords with medium-to-low search volume. Remember to use the wording your TARGET MARKET would use to look for your products or services online.
The list will change and grow over time as you learn more about SEO and what works best for you. This is a DIY SEO audit, so get going.
PRO TIP: Search engine optimisation (SEO) is about testing, checking results, adjusting, and testing again, so get started.
DIY SEO audit checklist: Indexability
These are technical SEO techniques to make sure Google can find your website online. If Google can’t even find your pages, there’s no way it can rank them.
1. Check manual actions
This is done in Google Search Console. Log in and scroll down the left side menu to ‘Security & Manual Actions’. Click the arrow to open the menu and click ‘Manual Actions’. Hopefully, you will see a notice with a green check mark, “No issues detected”.
A ‘Manual Action’ is when someone at Google reviews your website and decides it violates their quality guidelines.
Manual Actions require immediate attention because sites and/or pages can be removed from search results entirely until they are fixed. There are many reasons why Google may issue a Manual Action. Luckily, Google Search Console will tell you the exact problems it found and which pages they appear on.
To lift a Manual Action, you’ll need to identify and fix the issue found and submit a reconsideration request to Google to have the action removed.
2. Check your SSL certificate
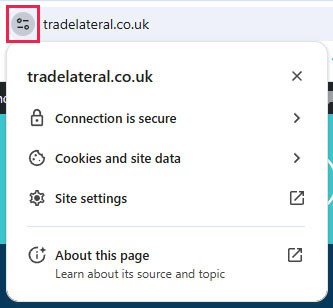
Google won’t rank your site without an SSL certificate anymore. Secure sites have SSL certificates installed and will display this in the address bar – your URL should begin with https://. Your website host will probably be able to install and activate your SSL certificate for you.
Check if your site has an SSL certificate installed. Use this SSL Checker tool, and also make sure you see this when visiting your site on Chrome:
3. Check your sitemap on Google Search Console
If you installed and set up the Yoast plugin at the beginning of this audit, this step will be easy.
- Log in to Google Search Console
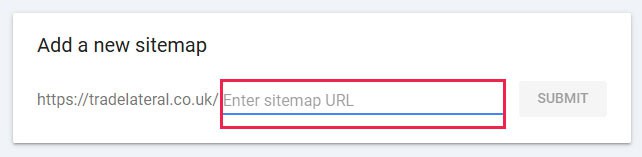
- Under ‘Indexing’ on the left, click ‘Sitemaps’
- Even if you have a sitemap listed, to be safe, add your sitemap by typing sitemap_index.html into the ‘Enter sitemap URL’ field, and click submit:
4. Check your crawled and indexed pages in Google Search Console
Google works by crawling the internet and discovering URLs. Then it visits the pages it discovers and indexes their content. Once content is indexed, it can be displayed in search results.
You want Google to have crawled and indexed all the pages on your site that you WANT to appear in search results. (Some pages don’t need to appear, like your Privacy Policy – so you can safely ignore these.)
In Search Console, under the ‘Indexing’ menu on the left, click ‘Pages’. If you have 50 pages on your website that you want to appear in search results, but only 10 are indexed, that could be a problem.
Scroll down the ‘Pages’ screen in Search Console to check the reasons your pages haven’t been indexed. Some reasons will make sense so that the warnings can be ignored.
To check if Google has indexed a page, copy the page URL into the ‘Inspect’ field at the top of this page, and push Enter:

Search Console will tell you whether the page has been indexed or isn’t on Google. If it’s NOT on Google, click ‘Request Indexing’ to prompt Google to index your page. It’s not guaranteed Google will do so, but it helps a lot. Continue doing this for all pages that aren’t yet indexed.
PRO TIP: This ‘Request Indexing’ feature limits how many requests you can make each day, so if you have a lot of pages to request, you might need to do this over a few days.
5. Check for errors on Screaming Frog
Open Screaming Frog and type your URL into the top field:

Click the green ‘Start’ button.
You will see the progress of the crawl in the bottom right of the screen in a light green bar:

Once the scan is complete, check the ‘Status Code’ heading. Here you are going to look for error codes. These will tell you if any of your pages are broken and are returning ‘404 errors’. A 404 error occurs when the page (URL) is not found. Google does not like these errors, and they should be fixed or redirected.
This is a great Redirection plugin for WordPress.
You will probably need to permanently redirect any broken pages to new URLs, using a 301 redirect. A 301 redirect is a permanent redirect that takes visitors and search engines to a new URL when the old one is no longer active or accessible.
Keep adding redirects to your website until there are no more 404 errors.
DIY SEO audit checklist: Website structure
The way your website is structured can impact how easily a search engine (or a human) can understand and navigate it. The easier it is to access all your content, the more likely your site is to appear in search results.
1. Does your website use a clear hierarchy structure?
Your website should have a clear information hierarchy, with the most important information in the main menu and less important information in drop-downs from there, where it makes sense. Ideally, each page should be between 3 and 4 clicks away from your home page, at most!
PRO TIP: A well-structured website will also appeal more to your users because it is clearly laid out and easy to use. Google wants to rank web pages that users love and interact with. Never forget that Google always wants to give its users the BEST website experience they can. If your site is difficult to navigate, neither users nor Google will want to engage with it.
IMPORTANT NOTE
If you decide you need to change your website’s structure, be VERY careful when changing page URLs. You must redirect any edited URLs to avoid losing their traffic. This is especially important if you want to change your permalink structure. Permalinks should seldom be changed on an established website.
2. Are your URLs SEO friendly?
Review the URLs on your website. (This is easily done on Screaming Frog.) The URLS typically look something like this: https://tradelateral.co.uk/seo-services/
There are 4 main elements to an SEO friendly URL:
- It’s short
- It describes the page content
- It contains the page’s target keyword
- It’s easy to read and understand
When structured correctly, these SEO friendly URLs can:
- Help search engines determine page relevance
- Incorporate keywords that help your page rank
- Encourage users to click through to your page from the search results by describing what’s on it
- Show search engines where your page is in your website’s hierarchy
PRO TIP: If you discover that you need to change your URLs, try to follow these guidelines:
- Don’t use spaces or underscores – rather use hyphens to separate words
- Don’t use numbers – rather use words
- Keep letters lowercase (uppercase letters can point to different pages, unless you have the correct redirects in place)
- Keep URLs short
- Make URLs readable
- Keep them consistent (create rules for your site and follow them on every page)
3. Check for orphan pages
Orphan pages are pages that have no internal links linking to them. This usually means that search engines and humans can’t find these pages on your website.
Here, you will need to connect Screaming Frog to your Google Analytics and Google Search Console. Here are the full instructions for finding orphaned pages using Screaming Frog.
Once you have discovered them, you can add internal links on your website from several pages to each of your orphaned pages. Now, Google and users will be able to find these pages.
4. Is your website mobile responsive?
Does your website look good on mobile, and is it completely accessible? Excellent mobile responsiveness is critical to SEO. It’s unlikely your site will rank in search results if it doesn’t look good and work perfectly on all devices.
Check this on your phone, in several browsers, and on any other phones or computers you can find. Remember to test desktops, laptops, tablets and phones – the more the better!
Make sure you fix anything that’s broken.
5. How fast is your website?
Google wants to provide the best experience for its searchers, so it ranks pages that are very fast to download and view. If your website is slow on desktop OR mobile, it will negatively impact your rankings.
You can test your site on GTMetrix here and on Google’s PageSpeed Insights here.
LOTS of issues can cause your website to load slowly, but here are a few main reasons that you could tackle:
- Too many (or badly built) plugins
- A badly built theme
- Large images
- No caching plugin
- No CDN (content delivery network) – eg, Cloudflare
- Slow hosting (you get what you pay for with web hosting, and cheap hosting can be very detrimental to your site speed)
- Pages that are too busy or use too many dynamic elements
DIY SEO audit checklist: Content optimisation & quality
Remember the golden rule: Google wants to provide its searchers with the best possible search results and user experience. This means they want to ensure their search results include useful pages with very high-quality content.
1. Does your website have duplicate content?
Duplicate content can cause a host of problems. It can also make your own website pages compete with each other for search ranking places, and dilute your ranking ability.
Use Siteliner to check your duplicate content. Aim for 15% or less duplicate content. If your site has more, review your pages and remove or rearrange content to avoid exceeding the 15% threshold.
2. Check your page metadata
Yoast is the best tool for this type of on-page SEO. Log in to your WordPress backend and open each page on your site that you want to rank on search engines. Scroll down to the Yoast section and make sure each page has:
- A focus keyphrase
- An SEO title
- A meta description
Also, make sure any images on your page have alt tags. Alt tags describe the content and context of the image on your page. They help people who use screen readers, such as those with visual impairments, understand the content on your website.
3. Consider the quality of your content
This might be the most important point of all! This means that you need high-quality, relevant, trustworthy, and authoritative content on your website to stand a chance of ranking in search results. You should have a website content plan in place to refer to during this step.
Evaluate each of the pages you want to rank:
- Are they informative and relevant?
- Do they answer the search intent of Google searchers?
- Are you offering useful information, in as much detail as a user might need?
Getting this step right is tough, and your website will probably evolve. You will write content, and rewrite it when you know more, or track your results. Keep working on producing the best possible content you can, as often as you can. You will eventually get there!
Addressing the issues you uncovered during your DIY SEO audit
You can fix them as you go, or create a list to tackle once you’ve read through all the directions.
Either way, start with the low-hanging fruit. Make any quick changes you can and track your rankings on Ubersuggest (main menu – ‘Rank Tracking’).
Continue to make changes to your website and build on your progress. SEO efforts tend to snowball. As you start to rank on Google for some low-volume searches, you will notice an overall boost to your rankings. Keep at it.
Search engine optimisation is a long-term project that requires ongoing work. Don’t give up – the boost to your website traffic will be worth it. The more effort you put in, the more benefit you will get out.
If you have a question or need help, please get in touch with us. Our expert team can even conduct an SEO audit for you if you don’t have time. We have spent years honing our skills and can start working on your website SEO immediately.
Good luck! Your new website visitors are waiting to meet you!